Akai Pro MIDImix - Setup with Ableton Live Lite
 Up until now, there was just no solution for musicians and producers who needed a compact, easily portable way to mix and process their projects on site. But MIDImix is the best solution for portable mixing on the go. MIDImix offers an intuitive, familiar mixer layout, solid connectivity with the most popular DAWs, and legendary Akai Professional quality. MIDImix is exactly what you need to do great mixes and professional processing on site—at the same time. Here is a guide to show you how to set this up with the included Ableton Live Lite software.
Contents
- MIDImix Hardware Setup
- Ableton Live 9 Lite Software Setup
- Virtual Instruments and Plugins
- Default Plugin Locations
- Further Technical Support
MIDImixHardware Setup
-
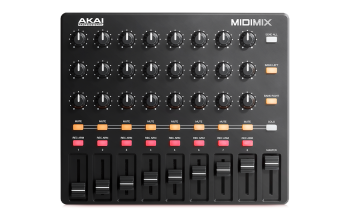
First, connect the Akai MIDImix series controller to an available USB port on your computer using the supplied cable and power the controller on.
- Since this is a very simple pad controller and is class compliant it does not require any on board setup. Once connected it is ready for use.
- Ableton Live can automatically map the controls of your Akai Midimix using what are called "remote scripts". The remote script for the Akai Midimix can be downloaded from the link below:
-
Note: Ableton Live version 9.x or later is required to use these "remote scripts". Live 8.x or earlier are not compatible.
Follow the steps below to add this new remote script to Ableton Live:- Extract the download above.
- Place the Midimix folder into the following directory:
MAC OS X: Applications > Ableton Live icon (right click and select Show Package Contents) > Contents > App Resources > MIDI Remote Scripts > (place Midimix folder here)
Windows: C:\ProgramData\Ableton\(your Live version)\Resources\MIDI Remote Scripts\(place Midmix folder here)
Note: ProgramData is a "hidden" folder. Follow the steps to show hidden folders on Windows.
Ableton Live 9 Lite Software Setup
- First, connect the Akai MIDImix series controller to an available USB port on your computer using the supplied cable, and launch Ableton Live 9 Lite.
- Next, open the Ableton Live 9 Lite Preferences window. Choose your Audio Device in the Audio tab. This will be dependent upon the audio interface that you are using.
MAC:
Select Live > Preferences
or use the key command shortcut - [Command + comma]PC:
Select Options > Preferences
or use the key command shortcut - [Control + comma]
-
Select the MIDI / Sync tab from the left side of the window. Within the MIDI Ports section, adjust the settings as suggested below:
Next to Input: MIDIMix, toggle On the button in the Track, Sync and Remote columns as shown in the image below.
Next to Output: MIDIMix, toggle On the button in the Track, Sync and Remote columns as shown in the image below.
- Next, at the top of the window under Control Surface, choose MIDImix from the drop-down list in row. Also, choose MIDImix from the Input and Output drop-down menus in row 1.

Virtual Instruments and Plugins
Note for Windows users only: If you have difficulty locating your plugin in your Plug-Ins category within Ableton Live 9 Lite, be sure Ableton Live 9 Lite is reading plugins from the correct location where your plugin is installed. To do this:
- Open the Preferences menu in Ableton Live 9 Lite
MAC:Select Live > Preferences or use the key command shortcut - [Command + comma]
PC:Select Options > Preferences or use the key command shortcut - [Control + comma]
- Choose the File Folder tab

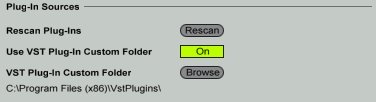
- Under the heading Plug-In Sources:
Toggle On the button next to Use VST Plug-In Custom Folder
Note the location under VST Plug-In Custom Folder. - If this location is not set correctly, next to VST Plug-In Custom Folder, choose Browse, browse to the correct folder, and press OK.
Default Plugin Installation Locations
SONiVOX Big Bang Cinematic Percussion Installation Locations:
Windows:
32-bit and 64-bit: C:\Program Files (x86)\SONiVOX\VstPlugins\
Mac:
(AU): Macintosh HD > Library > Audio > Plugins > Components
(VST): Macintosh HD > Library > Audio > Plugins > VST
Big Bang Cinematic Percussion Setup
- Within the Ableton Live 9 Lite Session View, under the Categories heading, choose Plug-Ins.
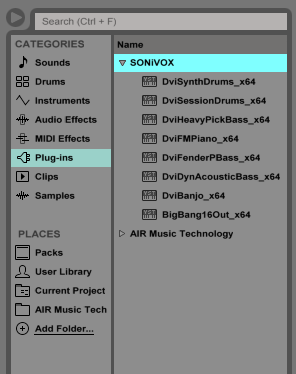
- In the right-hand column next to Categories, click-and-drag BigBang16Out_x64 onto a MIDI track to load Hybrid 3 into your Ableton Live 9 Lite session.

- The Big Bang Cinematic Percussion virtual instrument interface will now open.

Further Product Support
Whether you are a customer or dealer, if you already own an M-Audio product, or if you just have pre-sales questions, the M-Audio technical support team is available to help!
Visit the link below to connect with any of the following support options: online community support, phone support, email support.