Akai Pro MPK2 Series - Setup in FL Studio 11
 The Akai MPK2 series controllers combine deep software integration, enhanced workflow, and core technologies from the iconic line of MPC workstations. The MPK225, MPK249, and MPK261 are engineered to be all-in-one controller solutions for comprehensive interfacing and manipulation of virtual instruments, effect plugins, DAWs, and more. This articles walks through how to setup the MPK2 series controller with FL Studio 11.
Contents
- MPK2 Series Hardware Setup
- FL Studio Software Setup
- Virtual Instruments and Plugins
- Additional Resources
- Further Technical Support
MPK2 Series Hardware Setup
- First, connect the Akai MPK2 series controller to an available USB port on your computer using the supplied cable and power the controller on.
- Press the PRESET button and use the data dial to scroll to Preset: 10 Cubase. Press the PUSH TO ENTER knob.
Note: The presets, preset names, and order of presets may vary depending on the specific model.
- Next, press the EDIT button and then tap a transport control such as STOP, PLAY or REC. Use the data dial to change the Type: to MMC. Then press the PUSH TO ENTER knob.


- Press the PRESET button to get back to the main preset screen.
- Press the GLOBAL button to enter the Global settings menu. Press the right arrow key until the display reads Clock Source: Use the rotary knob to select External.

- Hit the right arrow key until the display reads Save Globals. Press the PUSH TO ENTER knob to save the settings. The display will flash <Saving Globals>. When this is complete, the display will read <Enter To Store>.

- Press the PRESET button to return to the Fl Studio preset screen.
FL Studio Software Setup
- Open FL Studio 11.

- From the top menu, choose Options > MIDI Settings.

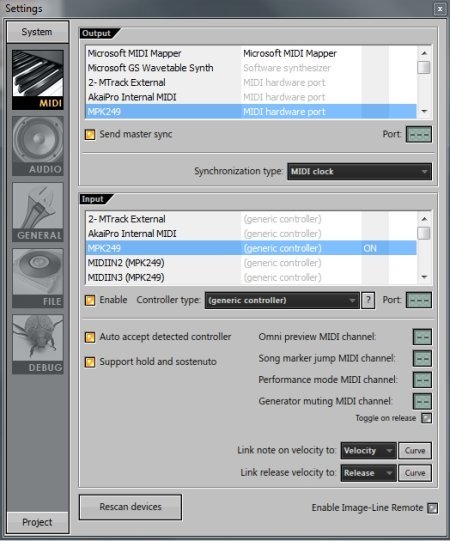
- In the window that opens, choose the MPK2 series controller under Output, choose the MPK2 series controller under Input, and click on the box next to Enable as shown in the image below. Also, to ensure synchronization for functions such as the Arpeggiator, click on the box next to Send master sync and ensure Synchronization type: is set to MIDI clock.
Virtual Instruments and Plugins
Adjusting the FL Studio Plugin Sources
If you have difficulty locating a plugin within the FL Studio 11 software, be sure Cubase is reading plugins from the correct location where your plugins are installed. To do this:
- From the top menu toolbar in FL Studio 11, choose Options > File Settings.

- In the window that opens, click on the
 button under VST plugins extra search folder.
- Browse to the location of your installed VST plugins and press OK.

- Close the Settings window.
- From the top menu toolbar in FL Studio 11, choose Options > File Settings.
Default Plugin Installation Locations
AIR Hybrid 3 Default Installation Locations:
Windows:
32-bit: C:\Program Files (x86)\VstPlugins\
64-bit: C:\Program Files\vstplugins
Mac:
(AU): Macintosh HD > Library > Audio > Plugins > Components
(VST): Macintosh HD > Library > Audio > Plugins > VST
SONiVOX Twist 2 Default Installation Locations:
Windows:
32-bit: C:\Program Files (x86)\SONiVOX\VstPlugins\
64-bit: C:\Program Files\vstplugins
Mac:
(AU): Macintosh HD > Library > Audio > Plugins > Components
(VST): Macintosh HD > Library > Audio > Plugins > VST
SONiVOX Eighty Eight Default Installation Locations:
Windows:
32-bit and 64-bit: C:\Program Files (x86)\SONiVOX\VstPlugins\
Mac:
(AU): Macintosh HD > Library > Audio > Plugins > Components
(VST): Macintosh HD > Library > Audio > Plugins > VST
AIR Hybrid 3
FL Studio 11 does not allow for native use of VST instruments however, FL Studio has a built-in which does allow for the inclusion of third-party VST instruments. Because of the use of this wrapper, Hybrid 3 can open and be used in FL Studio, however the MPK2 series controller will not automatically map to the various functions in Hybrid 3. To load Hybrid 3 in FL Studio 11 and then manually MIDI map various controls on the MPK2 series controller to Hybrid, follow the steps suggested below.
- Open FL Studio 11.

- Right-click on an instrument button and choose Insert > More...

- In the window that opens, locate Hybrid and/or Hybrid_x64 and click on the box just to left of it to add an F to the box and allow FL Studio to use the plugin. If the plugin name is red, that is because it is the first time the plugin has been scanned and added to the FL Studio plugin list. Close the Select generator plugin window.

- Next, right-click on an instrument and choose Insert > Hybrid or Hybrid_x64

- A new instrument insert will be created and the Hybrid interface will open.

MIDI Mapping in FL Studio
By pressing the keys or pads on the MPK2 series controller, you will now trigger sound in Hybrid 3. However, the faders and knobs on the controller are not automatically mapped as mentioned above. To manually MIDI map in FL Studio, follow the steps suggested below:
- At the top of the main FL Studio window, ensure that you have the Recording Panel toolbar available by right-clicking in an empty area in the toolbar and choosing Recording Panel.

You will now be able to access the Recording Panel.
- In the Recording Panel, click on the Multilink to Controllers button.

-
Click-and-drag on the control you want to MIDI map.
-
Move the knob or fader on the MPK2 series controller and the function of choice will pick up on the movement coming from your MPK2 controller and begin to move with your physical adjustment.
- At the top of the main FL Studio window, ensure that you have the Recording Panel toolbar available by right-clicking in an empty area in the toolbar and choosing Recording Panel.
SONiVOX Twist 2
FL Studio 11 does not allow for native use of VST instruments however, FL Studio has a built-in which does allow for the inclusion of third-party VST instruments. Because of the use of this wrapper, Twist 2 can open and be used in FL Studio, however the MPK2 series controller will not automatically map to the various functions in Twist 2. To load Twist 2 in FL Studio 11 and then manually MIDI map various controls on the MPK2 series controller to Twist 2, follow the steps suggested below.
-
Open FL Studio 11.
-
Right-click on an instrument button and choose Insert > More...
- In the window that opens, locate Twist 2 and/or Twist 2_x64 and click on the box just to left of it to add an F to the box and allow FL Studio to use the plugin. If the plugin name is red, that is because it is the first time the plugin has been scanned and added to the FL Studio plugin list. Close the Select generator plugin window.

- Next, right-click on an instrument and choose Insert > Twist 2 or Twist 2_x64

- A new instrument insert will be created and the Twist 2 interface will open.

MIDI Mapping in FL Studio
By pressing the keys or pads on the MPK2 series controller, you will now trigger sound in Twist 2. However, the faders and knobs on the controller are not automatically mapped as mentioned above. To manually MIDI map in FL Studio, follow the steps suggested below:
- At the top of the main FL Studio window, ensure that you have the Recording Panel toolbar available by right-clicking in an empty area in the toolbar and choosing Recording Panel.
You will now be able to access the Recording Panel. - In the Recording Panel, click on the Multilink to Controllers button.
- Click-and-drag on the control you want to MIDI map in Twist 2.

- Move the knob or fader on the MPK2 series controller and the function of choice will pick up on the movement coming from your MPK2 controller and begin to move with your physical adjustment.
- At the top of the main FL Studio window, ensure that you have the Recording Panel toolbar available by right-clicking in an empty area in the toolbar and choosing Recording Panel.
SONiVOX Eight Eight Ensemble 2 Setup
FL Studio 11 does not allow for native use of VST instruments however, FL Studio has a built-in which does allow for the inclusion of third-party VST instruments. Because of the use of this wrapper, Eighty Eight Ensemble 2 can open and be used in FL Studio, however the MPK2 series controller will not automatically map to the various functions in Eighty Eight Ensemble 2. To load Eighty Eight Ensemble 2 in FL Studio 11 and then manually MIDI map various controls on the MPK2 series controller to Eighty Eight Ensemble 2, follow the steps suggested below.
-
Open FL Studio 11.
-
Right-click on an instrument button and choose Insert > More...
-
In the window that opens, locate EightyEight 2 and/or EightyEight 2_x64 and click on the box just to left of it to add an F to the box and allow FL Studio to use the plugin. If the plugin name is red, that is because it is the first time the plugin has been scanned and added to the FL Studio plugin list. Close the Select generator plugin window.

-
Next, right-click on an instrument button and choose Insert > EightyEight 2 or EightyEight 2_x64

-
A new instrument insert will be created and the Eighty Eight Ensemble 2 interface will open.

MIDI Mapping in FL Studio
By pressing the keys or pads on the MPK2 series controller, you will now trigger sound in Eighty Eight Ensemble 2. However, the faders and knobs on the controller are not automatically mapped as mentioned above. To manually MIDI map in FL Studio, follow the steps suggested below:
- At the top of the main FL Studio window, ensure that you have the Recording Panel toolbar available by right-clicking in an empty area in the toolbar and choosing Recording Panel.
You will now be able to access the Recording Panel. - In the Recording Panel, click on the Multilink to Controllers button.
- Click-and-drag on the control you want to MIDI map in Eighty Eight Ensemble 2.
- Move the knob or fader on the MPK2 series controller and the function of choice will pick up on the movement coming from your MPK2 controller and begin to move with your physical adjustment.
- At the top of the main FL Studio window, ensure that you have the Recording Panel toolbar available by right-clicking in an empty area in the toolbar and choosing Recording Panel.
Additional Resources
- Akai MPK2 Series - Frequently Asked Questions
- Akai MPK2 Series - Complete Preset Overview
- Akai MPK2 Series - Setup in Ableton Live 9 Lite
- Akai MPK2 Series - Setup in Steinberg Cubase
- Akai MPK2 Series - Setup in MPC Essentials
- Akai MPK2 Series - Setup in Pro Tools 11
- Akai MPK2 Series - Setup in PreSonus Studio One
- Akai MPK2 Series - Setup in Logic Pro X
- Troubleshooting Class-compliant USB Computer Peripherals
- Troubleshooting USB MIDI Devices on Mac
- Mac OS - Problems with MIDI Devices after and Update
- Optimizing your system, Improving Performance, and Managing Latency
Further Technical Support
Whether you are a customer or dealer, if you already own an Akai Pro product, or if you just have pre-sales questions, the Akai Pro technical support team is available to help!
Visit the link below to connect with any of the following support options: online community support, phone support, email support.