M-Audio Keystation Series - Setup with Ableton Live 9 Lite
 The M-Audio Keystation series controllers are simple, powerful MIDI controllers designed for sequencing music and playing virtual instruments on your Mac or PC. This article walks through setting up your M-Audio Keystation for use with Ableton Live 9 Lite and the SONiVOX Eighty Eight Ensemble 2 virtual instrument.
Contents
- Keystation Series Hardware Setup
- Ableton Live 9 Lite Software Setup
- Virtual Instruments and Plugins
- Additional Resources
- Further Technical Support
Keystation Series Hardware Setup
The Keystation series controllers are defaulted to the protocol to allow for Transport control (Play, Stop, Record, Directional buttons).
To switch between Mackie Control and HUI:
- Press the ADVANCED button to put the Keystation into Edit Mode.

- Press the key representing MACKIE/HUI.
Note: The "+" and "-" OCTAVE LEDs will be lit green when in Mackie mode and red when in HUI mode.

- Press the ENTER key.
- Press the ADVANCED button to put the Keystation into Edit Mode.
Ableton Live 9 Lite Software Setup
- First, connect the M-Audio Keystation series controller to an available USB port on your computer using the supplied cable, and launch Ableton Live 9 Lite.
- Next, open the Ableton Live 9 Lite Preferences window. Choose your Audio Device in the Audio tab. This will be dependent upon the audio interface that you are using.
MAC:
Select Live > Preferences
or use the key command shortcut - [Command + comma]
PC:
Select Options > Preferences
or use the key command shortcut - [Control + comma]
- Select the MIDI / Sync tab from the left side of the window. Within the MIDI Ports section, adjust the settings as suggested below:
Next to Input: Keystation 49 (or 61, 88), toggle On the button in the Track, and Remote columns as shown in the image below.
Next to Output: Keystation 49 (or 61, 88), toggle On the button in the Track, and Remote columns as shown in the image below.
- Next, at the top of the window under Control Surface, choose MackieControl from the drop-down list in row 1. Under the Input column in Row 1, choose Keystation 49 (Port 2).

You can leave the third drop-down menu in Row 1 under Output set to None.
The Transport control (Play, Stop, and Record) on the Keystation series controller will now control and correspond with the Transport functions in Ableton. In addition, the Directional buttons on the Keystation series controller will now
Virtual Instruments and Plugins
Adjusting Ableton Live 9 Lite Plugin Sources
Important Note for Windows users:
Ableton will only allow you to use one plugin folder at a time. This is common. In order to use both plugins inside of Ableton, you'll want to install both plugins to a single folder. To do this, change the install location of the VST plugin (not the content or plugin data) during the installation for one of the plugins. We'd recommend installing Eighty Eight Ensemble and Xpand!2 (both 32 and 64 bit) to this folder:
- C:\Program Files\Steinberg\VstPlugins
Once the plugins have been installed, you'll want to tell Ableton where to find them. In other words, you'll want to direct Ableton to your plugin folder. Follow the steps below:
- Open the Preferences menu in Ableton Live 9 Lite
MAC:
Select Live > Preferences
or use the key command shortcut - [Command + comma]
PC:
Select Options > Preferences
or use the key command shortcut - [Control + comma] - Choose the File Folder tab

- Under the heading Plug-In Sources:
- Toggle On the button next to Use VST Plug-In Custom Folder
- Note the location under VST Plug-In Custom Folder.
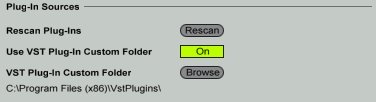
- If this location is not set correctly, next to VST Plug-In Custom Folder, choose Browse, and browse to your plugin folder. Remember, if you set the location of your plugin folder during the installation process as described above, your plugin folder will be C:\Program Files\Steinberg\VstPlugins. If not, choose the default location for one of the plugins below:
SONiVOX Eighty Eight Default Installation Locations:
Windows:
32-bit and 64-bit: C:\Program Files (x86)\SONiVOX\VstPlugins\
Mac:
(AU): Macintosh HD > Library > Audio > Plugins > Components
(VST): Macintosh HD > Library > Audio > Plugins > VST
AIR Xpand!2 Default Install Locations:
Windows:
32-bit: C:\Program Files (x86)\Steinberg\VstPlugins
64-bit: C:\Program Files\Steinberg\VstPlugins
Mac:
(AU): Macintosh HD > Library > Audio > Plugins > Components
(VST): Macintosh HD > Library > Audio > Plugins > VST
SONiVOX EightyEight Ensemble 2
- Within the Ableton Live 9 Lite Session View, under the Categories heading, choose Plug-Ins.
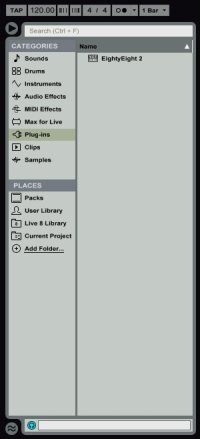
- In the right-hand column next to Categories, click-and-drag Eighty Eight 2 onto a MIDI track to load Eighty Eight Ensemble 2 into your Ableton Live 9 Lite session.
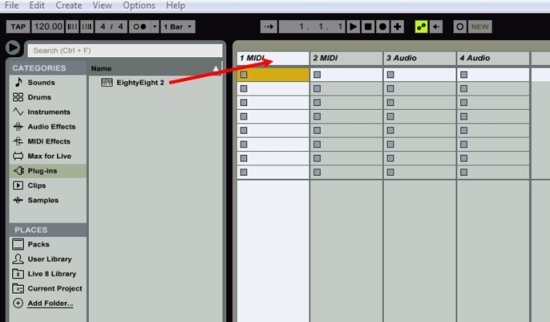
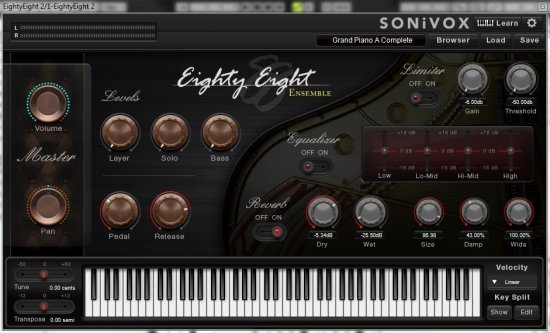
- The Eighty Eight Ensemble 2 virtual instrument interface will now open.
- Within the Ableton Live 9 Lite Session View, under the Categories heading, choose Plug-Ins.
Additional Resources
- M-Audio Keystation 49 User Guide
- M-Audio Keystation 61 User Guide
- M-Audio Keystation 88 User Guide
- M-Audio Keystation Series - Setup with Ableton Live 9 Lite
- Troubleshooting Class-compliant USB Computer Peripherals
- Troubleshooting USB MIDI Devices on Mac
- Mac OS - Problems with MIDI Devices after and Update
- Optimizing your system, Improving Performance, and Managing Latency
Further Product Support
Whether you are a customer or dealer, if you already own an M-Audio product, or if you just have pre-sales questions, the M-Audio technical support team is available to help!
Visit the link below to connect with any of the following support options: online community support, phone support, email support.